Thursday, June 28, 2018

Knit then Stitch.....Stitch then Knit

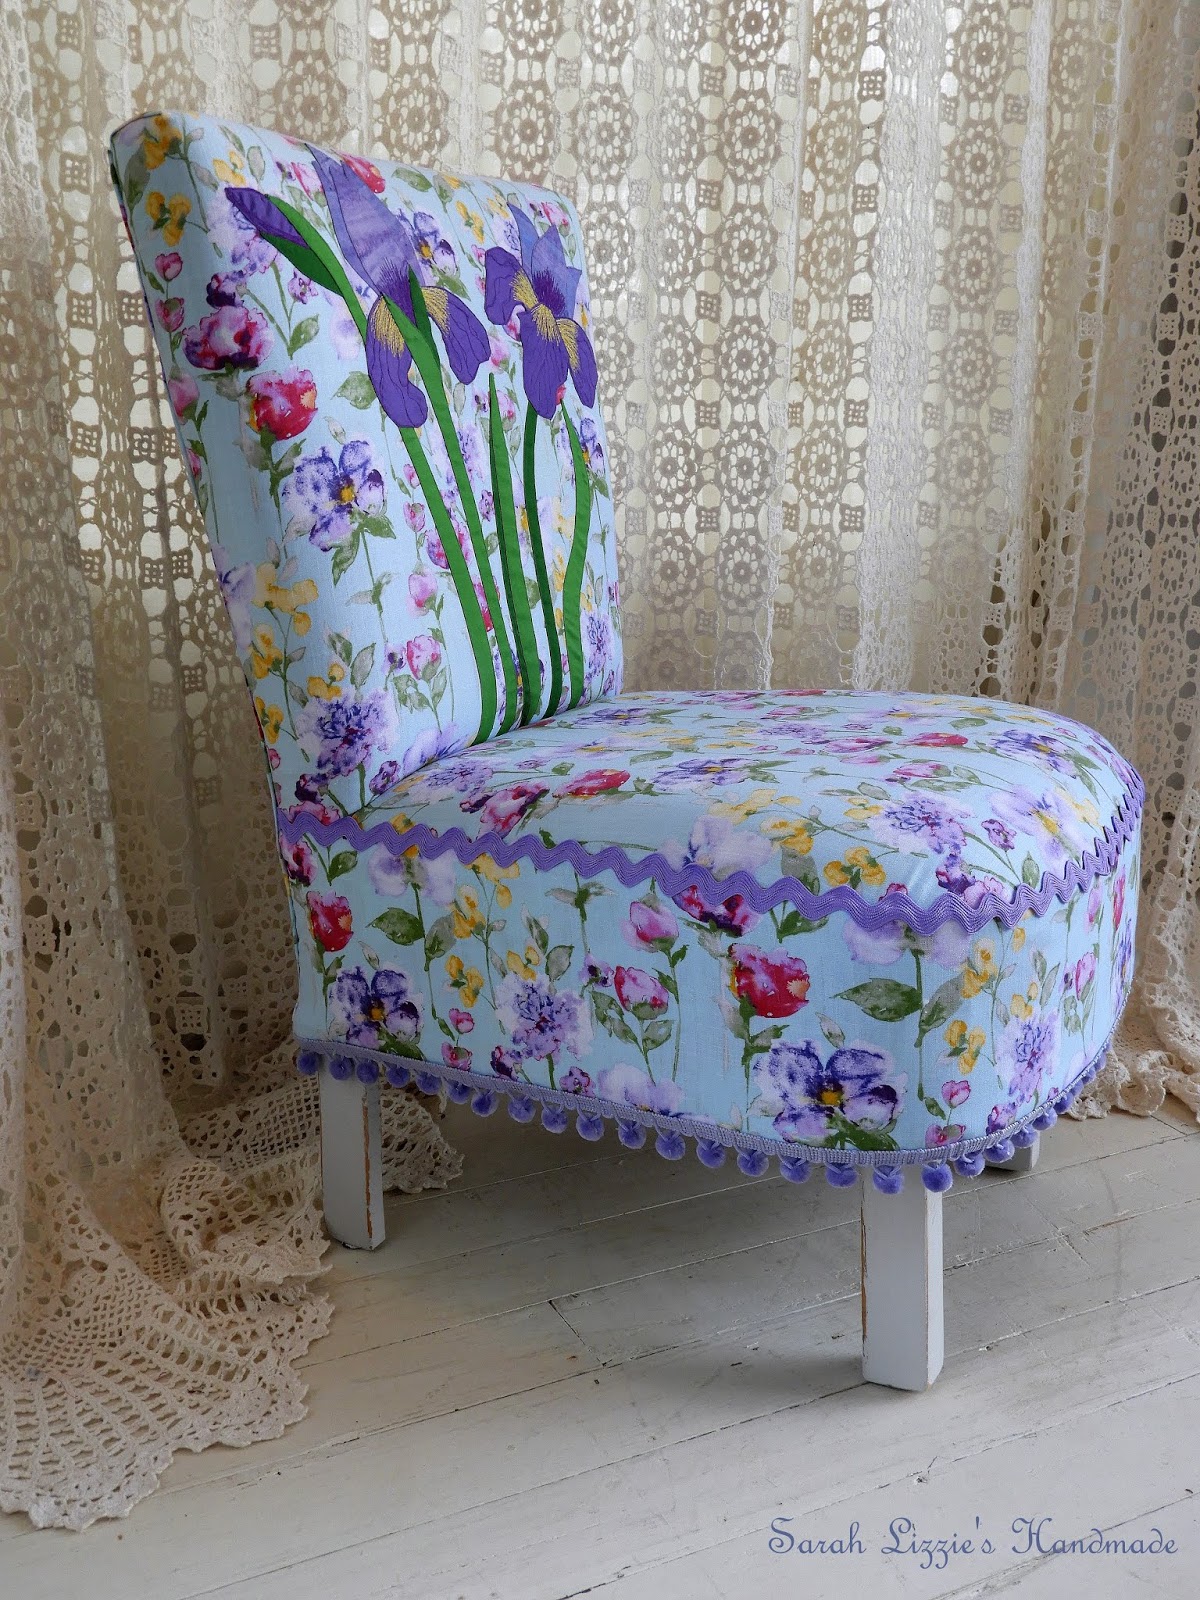
Hello lovelies. Thank you all for your sweet comments re my little slipper chair. I have spent many moments these past two weeks sitting on it whilst knitting a stitch or two of my purple aran cardie. My little slipper chair has even been used for what it was originally intended for back in the day.....that is to sit on it, enabling the easier slipping on of one's shoes.....(my San Fransisco boots need a shoe horn to slip one's feet into). Come to think of it, as I have been knitting my purple pretty I have been sitting on my patchwork needlepoint chair as well.....I love to spread the lurve around. =) This past little while has been  filled with a little knitting then stitching....then a little stitching then knitting. 

My cardie is progressing, albeit slowly. If I just sat and knitted and knitted, my cardie would be on my back keeping out the wintry chill. My problem is I get distracted with other pretties that are colliding around in my imagination. The nature of knitting is, is it not, that you pick up whatever it is you are knitting and when you have progressed a little (or indeed a lot) you put it down until the next time. Sometimes for me  it is a very long time.

The back and fronts of my cardie are finished and now I am knitting the yoke. I am enjoying this pattern as it doesn't tax the brain pan too much. Though I do relish a complicated knitting pattern, it is wonderful  to just sit and knit and not have to think too much about it.

You know how I said I get easily distracted, well, as I knitted I became a little preoccupied with another pressing thought. As I sat and continued to knit and purl and cable, it occurred to me that I do not have a bag in which to hold my knitting. Sure, I have  a few baskets but I wanted something more suitable when I am out and about. A knitting bag was required, a carryall to hold the paraphernalia needed when knitting a woolly pretty. A more suitable bag to hold knitting needles, yarn needles for sewing in the ends, tape measure, row markers, stitch holders, pen and notebook for taking notes for keeping track of where you are in the pattern, pattern books and all those other knitting bits and pieces.


I thought a scrappy bag could be rather spiffy. Gathering together pretty fabrics I stitched 1" strips together.


Though the strips joined together dance a merry polka, to add a little interest I decided to machine sketch a little picture. It's been an age since I have machine sketched anything. Doodling with my machine is always an enjoyable pastime for me so I drew a picture of a girl  lazing on a sofa, knitting, with a kitty cat snoozing on the floor and a sweet birdie in a bird cage, and a pot of tea complete with a tea cup resting on a little table.

I chose a Koda fabric with the name of Bubble Gum as the background and sketched everything in black. With the machine sketching complete I ruched strips of fabric that I stitched together which will dosy doe around the border of the picture.  I drafted a pattern and thought I would use some pretty bamboo handles which I rescued from an op shop a long time ago.


Stitching my knitting gal onto the front of the bag, I then stitched the ruched strip of fabric to the  front, sashaying its way merrily around the edge.

After sewing the back and front together and stitching in the lining I then hand stitched the handles to the bag. I toyed with adding a touch of whimsy in the way of bobble trim or ric rac but believe it or not I didn't. Kinda hard to believe I know, but there you go. I was in a 'KISS' (keep it simple stupid) frame of mind.


Ooooh.....nothing makes my heart go pitty-pat quite like a sea of scrappy happiness!


But then........a sea of bright and happy, woolly loveliness makes my heart skip a beat or two, too.


I am happy with my new knitting bag. I love the pretty fabrics and I love the sense of fun it exudes. It is a good size too; about 20" in width and 15" in length....big enough to carry all those woolly bits and pieces. It was such an easy pretty to design and make. From go to woe it was a breeze to fashion. After the herculean stitching of my pretty curtains and tarted up chairs of late, I was up for a little stitching that required no thinking, nor indeed any opposition. 'Tis wonderful, is it not, to every now and then whip up something quick and simple??


Now all I have to do is get on with the knitting of my cardie. Maybe, just maybe this pretty will soon be on my back, all buttoned up, bracing against the frigid winter chill. That is of course if me, myself and I do not  imagine another 'must have' pretty in the dark corridors of my discombobulated brain pan. One never really knows, does one?? But......this is what makes a creative life oh so fascinating!

Sending a little love your way this lovely day. Until the next time.......


Saturday, June 16, 2018

Sitting Pretty

Many years ago, as I walked home from work I happened upon furniture that had been ousted to the kerb waiting for removal by the council pick-up contractors a pavement acting as an alfresco bric-a-brac showroom. Amongst rather unremarkable once-loved items that certainly deserved to be carted off to the local tip, that place of refuse for once-loved furniture, there was a little woebegone slipper chair with a rather unremarkable cover. Sure, it had seen much better days, but I saw perhaps what the low-slung little chair could become. Besides, being small it certainly wouldn't take up much room. I am afraid my penchant for old and pre-loved chairs had surfaced yet again. Ho hum.....another tarted up chair story.......so, so sorry!!

Back in the day these little slipper chairs were often used when maids helped their mistress, the lady of the house put on her shoes or slippers, hence the name. Now......there is no lady's maid dashing into my boudoir each morning to help me get dressed or indeed, brush my hair, fashioning my locks into some fancy coiffured hairdo. Neither is there a lady's maid to help put on my shoes. I can do that myself.......just......BUT.....with the entry into my venerable years, I rather like the idea of sitting on a chair low to the ground to slip on my shoes; which could become no small feat in my feeble and decrepit condition as the years slip by.

So........I picked up the sweet little chair, swung it on my back and proceeded to walk home in a strained and laboured way, rather like a slow, slow tortoise lugging it's home on it's back. You can laugh at this juncture because to be honest I did look positively hilarious, but I will go to extraordinary lengths to re-home an antediluvian chair.

Upon moving to Tasmania, I had forgotten all about my little chair until recently when I was looking for something else in the man cave. Yikes.....the man cave.....where angels fear to tread.....but moving right along, I dusted the cobwebs away and hurried the spiders on to new homes where they could spin beautiful, silk-like gossamer, living quarters on some other antiquity waiting for a little tarting up (oh yes.....believe it or not there are more). After all I was in a hurry to prettify my little slipper chair.


I purchased this linen-like curtain fabric a while ago pretty much on a whim, thinking surely it would fit somewhere in my humble abode. I love the pretty blue background colour (blue is my hue) and rather like the water colour impression of the flowers.


Looking at the fabric and the chair I thought of appliqueing some Irises to the back just to add a little more visual interest. I wonder if a day will ever awake where I dress a chair in fabric and leave it be with no adornment, with no embellishment???? Somehow I don't think so. Seriously, there is an aberrant gene within my DNA!! I adore creative play. Sometimes it works, sometimes it doesn't, fingers crossed this time it does.

For the Irises I used a batik purple to blue fabric and a Kona fabric called Helliotrope. The stems are Kona fabrics in colours Peppercorn and Jungle. The greens I think, match quite nicely with the flower stems on the chair fabric.


I drew a couple of Irises on paper, then pinned them onto the back, adding stems to add a little more interest.

Being content with this simple arrangement I traced each pattern template onto freezer paper, ironed fabric onto the freezer paper templates and then cut out each flower/stem allowing 1/4" seam allowance, which I turned under as I ironed around all the pieces. Pulling the freezer paper out I then glued the seam allowance under. With all the flower and stem pieces ready for placing  I applied dabs of glue here and there on each flower part, then arranging and placing all onto the chair back fabric. Being satisfied with the arrangement I machine stitched around the flowers and stems onto the fabric. The thought of hand appliqueing the Irises did cross my mind for a fleeting moment but I thought better of it as this would have taken a lot longer. Besides I rather like the outline machine stitching. I then stitched some veins onto the lower petals of the Irises........not too many as I didn't want a botanically correct look. Let's face it, those of you whom are au fait with the finer, more intricate details of the 'Iridaceae'  will know that my sweet little Irises resting on my little slipper chair are certainly poor cousins to those elegant, showy flowers of the botanical world. Let's just say I have taken artistic license.


Being  happy with the Irises I then proceeded to dress the chair. With my trusty staple gun and hot glue gun on hand this didn't cause too much angst.


Slipper chairs of old usually had a flounce to the floor but to give this chair a modern look I wanted the legs to be seen. I did vacillate for a long while whether to sew a flounce on or not....I went with not. This chair obviously had a flounce for a reason. The legs were made in such a fashion that not a lot of thought went into aesthetics. The legs are more to be desired but with an inclination for a more modish look I painted the legs and sanded them, scuffing them up a little. This chair will certainly not be remembered by its shapely 'pins' but not to worry, with a lick of paint they are acceptable for viewing. To add a little bit of fun I added pom pom trim and ric rac.


Do you know if I had my time over again I would love to do an in-depth upholstery course. One of those courses that takes three years to master the intricacies involved in how to dismantle each part of a chair, cover said part with fabric and then reassemble everything again. Oh, how I would love to reupholster one of those beautiful, buttoned back french chairs with the most elegant of silhouettes, sitting atop curved cabriole legs but alas, I cannot as my skills I'm afraid are not quite up to speed. I would have oodles of subjects to practice my skill on, seeing my propensity of lugging home pre-loved chairs. Come to think of it, if I had my time over again there are so many things I would love to learn the nuts-and-bolts of  as I skip down the yellow brick road of creative pursuits; instead of my usual modus operandi of winging it!


I am happy with my little slipper chair and it's pretty, new cover. So much easier on the eyes than the awful beige, faux velvet that it was draped in. Sometimes I like to sit on little chairs whilst I enjoy a little hand stitching or knitting. Being small my slipper chair doesn't take up as much visual or physical space, and I love the fact that being little it can be moved from room to room......the boudoir, my sewing room, even the family room; it will fit in perfectly wherever it sits. AND.....I can now sit low to the floor and put on my shoes!!


From this li'l upholsterer's workroom (I use the term 'upholsterer' very, very loosely) or is it an alfresco furniture showroom where tarted up chairs seem to abound.......I don't rightly know......but whatever it is, I would love to wish you all a fabulous weekend. Me thinks I might spend a little time sitting  pretty on my sweet, little slipper chair.


Until the next time................

Linking to Handmade Monday


Monday, June 4, 2018

A Li'l Curtain Fixer Upper-ing

Hello lovelies! After a week of mulling over and over all things GDPR, Blogger, Google Analytics, cookies (not the bake-in-the-oven and store-in-the-cookie-jar, kind) private policies, blah, blah, blah.....I am back in my  little world of all things pretty and beautiful. Yes indeedy, I am back to waxing lyrical about stitching pretty things.

One day last week, whilst I was enjoying a cup of tea in my sunny family room, as I looked about me I decided that the curtains which graced my five metre long windows really were looking a tad sad. The sun had faded these window coverings in places and the lining had perished to the point that when I touched it, the lining would tear like paper.

I decided now was the time to do something about my once beautiful curtains. I had put it off for long enough. Now was the time to do a little fixer upper-ing to my curtains. I had stitched the curtains ten years ago, cutting vintage Italian coverlets into patches and stitching them together in a random arrangement. These curtains truly had seen better days. Also, I wanted a pretty, more pronounced backdrop with colours just a little more vivid for my tarted up needlepoint chair. Perhaps a splash of darker pinks and a darker mauve?? Isn't it funny the snowball effect that happens when you add a new pretty to a room and you decide that 'this' needs a little more verve and 'that' definitely needs a little more oomph! 

I love these curtains. I have lived with these pretties for ten years and still I have not grown weary of them. The gorgeous vintage coverlets always make me smile, even on those dull, sunless days. I had looked for a long while for suitable curtain fabric to replace what I had but nothing I saw even came close to matching the beauty of my patched, Italian coverlet pretties. That is of course, nothing that was less than $100 per metre. Oh, I saw gorgeous, gorgeous $100, $200 per metre fabric that would sing the merriest tune at my windows but alas, my purse would need to be overflowing with pennies from heaven for me to bring metres upon metres home with me.

I had enough remnants of coverlets sitting in my armoire so why not fashion something similar to what I already had. The thought was to pull the curtains down and only replace the patches that were looking a little "how's your mother" with new fabric, but upon starting to do this I decided that the old and new just didn't play nicely together.  When I suggested a complete revamp to my husband, just for a fleeting moment,  a look of the fear of God came into his eyes!! Come to think of it, I see that look quite often in his eyes when I say "I've got a fabulous idea"!! =) He knew (he has lived with me and smiled at my eccentricities for forty years) this li'l bit of curtain fixer upper-ing would mean some help from my significant other. These curtains weigh a ton so I was going to need another pair of hands to help me accomplish what I had in mind, and unfortunately for my husband, that other pair of hands was going to be his. Poor man, he truly is the most patient of men!

So the torture fun began. I don't know how many times I hung the curtains up as I stitched the patched coverlets together, checking the seams both vertically and horizontally were straight and then pulling them down. Up again, down again, up again, down again, .........and so on and so on and so on, clambering up and down the ladder until the curtains were pieced together and my persnickety beady eyes were happy. But that was only the beginning. Now I had to sew the grommet tape on. Have you ever made curtains where you have used grommet heading tape?? Sometimes it's easy as...........and then there are times when the blasted grommets decide that they are not going to co-operate and no matter what you do, it takes forever to push the blasted rings on until they click into position. I used a mallet, a piece of wood, my foot with my whole body behind it, but to no avail.....they were not going to budge. This process took hours. I have sewn curtains with grommet  tape many times before, mostly the process is quick and relatively pain free but not this time. Eventually that task was done and then the lining was sewn in and the side and bottom hems were stitched.

As I have a penchant for beautiful passementerie, I decided to embellish with some of these pretties randomly, here and there. Two years ago, for one of my favourite teenager's 13th birthday ('she' is one of my sewing girls), I stitched some curtains fashioned from vintage coverlets and passementerie. I loved them so much that I decided there and then that I really needed curtains dancing with lengths of these fanciful trimmings and fringings in my life. So that is exactly what I did. Yep......love, love, LOVE these decorative and elaborate lengths of gorgeousness.


Swirls and twirls of messy, beautiful passementerie.


Oh look, I'm wearing my pretty woolly. I have been living in it of late because it's a little chilly way down here.

The stitching of these curtains was a herculean task. They fought me all the way, especially forcing them through the sewing machine. There were times when the sewing machine wouldn't have a bar of these curtains but I pleaded, cajoled and enticed it to behave.......and finally it relented. This is where my husband's help was invaluable. He pulled and straightened the curtains as I fed the fabric through.


Are not these vintage Italian coverlets and gorgeous, fanciful trimmings beautiful?? Be still my beating heart!! I am soooooo in love with them!!


After a very long week, finally my Italian coverlet curtains with passementerie dancing in straight lines are up and saying......look at me....look at me!!


Love all the glorious textures of the vintage coverlets!


Fill my world with colour, glorious colour!!


You know, I don't think I will ever tire of seeing all these glorious Italian coverlets bedecked with passementerie adorning the family room windows. So, so happy these windows are dressed with beautiful new pretties. So, so happy I won't have to think about stitching curtains for these windows for another ten years. Me thinks, just between you and me my darling husband is very happy about that, too. =) So, so happy I can just sit, with a cup of tea in hand and drink in the beauty of  all that vintage gorgeousness! 

Have a beautiful week all you lovelies. Thank you so much for visiting my little place. I wonder what fancies I will conjure up whilst enjoying a cuppa, this week??

Until the next time......................


Linking this week with the lovely Jann's Share Your Cup.